
Build your own Bat House,
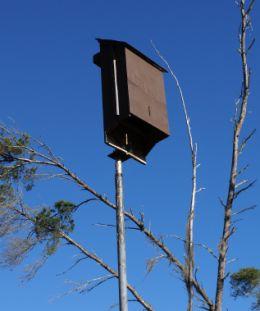
The Bat House
Building a bat house in your backyard may sound like a weird project for a large number of people, but not once you realize that one single little bat can gobble up to 1,000 mosquitoes within an hour. They also love to eat mothHow to Build a Bat House
Materials (makes one single chamber house)
Ø 1⁄4 sheet (2' x 4') 1⁄2" AC, BC or T1-11 (outdoor grade) plywood
Ø One piece 1" x 2" (3⁄4" x 11⁄2" finished) x 8' pine (furring strip)
Ø 20 to 30 exterior-grade screws, 1"
Ø One pint dark, water-based stain, exterior grade
Ø One pint water-based primer, exterior grade
Ø One quart flat, water-based paint or stain, exterior grade
Ø One tube paintable latex caulk
Ø 1" x 4" x 28" board for roof (optional, but highly recommended)
Ø Black asphalt shingles or galvanized metal (optional)
Ø 6 to10 roofing nails, 7⁄8" (if using shingles or metal roofing)
Recommended tools
Ø Table saw or h
Ø Caulking gun
Ø Variable-speed reversing drill
Ø Paintbrushes
Ø Screwdriver bit for drill
Ø Hammer (optional)
Ø Tape measure or yardstick
Ø Tin snips (optional)
 Construction
1. Measure
2. Roughen inside of backboard
3. Apply two coats of dark, water-based stain to interior surfaces.
Do not use paint, as it will fill grooves.
4. Cut furring strip into one 24"
5. Attach furring strips to back, caulking first. Start with 24" piece at top. Roost chamber spacing is 3⁄4".
6. Attach front to furring strips, top piece first (caulk first).
Leave 1⁄2" vent space between top
7. Caulk all outside joints to further seal roost chamber.
8. Attach a 1" x 4" x 28" board to the top as a roof (optional, but highly recommended).
9. Apply three coats of paint or stain to the exterior (use primer for first coat).
10. Cover roof with shingles or galvanized metal (optional).
11. Mount on building (south or east sides usually best).
Optional modifications to the single-chamber bat house
1. Wider bat houses can be built for larger colonies. Be sure to adjust dimensions for back
2. To make a taller version for additional temperature diversity, use these modifications: From a 2' x 8' piece of plywood, cut three pieces: 51" x 24", 33" x 24"
3. Two bat houses can be placed back-to-back, mounted between two poles, to create a three-chamber nursery house. Before assembly, cut a horizontal 3⁄4" slot in the back of each house about 9" from the bottom edge of the back piece to permit movement of bats between houses. Two pieces of wood, 1" x 4" x 41⁄4", screwed horizontally to each side, will join the two boxes. Leave a 3⁄4" space between the two houses,
One 1" x 4" x 34" vertical piece, attached to each side over the horizontal pieces, blocks light but allows bats
4. Ventilation may not be necessary in cold climates. In this case, the front should be a single piece 23" long. Smaller bat houses like this one will be less successful in cool climates. However, those mounted on buildings maintain thermal stability better
5. Durable plastic mesh can be substituted to provide footholds for bats. Attach one 20" x 241⁄2" piece to backboard after staining interior, but prior to assembly.
TIPS
Ø DO NOT hang bat house in tree or shady area. Make sure it receives 6-8 hours of sunlight each day.
Ø Mount box at least 12 feet above the ground.
Ø Hanging the bat house near a pond or stream may increase your chances of attracting bats to use it.
Ø Bats usually will not use a bat house during the winter.
Ø Be sure to clean
How to Build a Simple Bird House
 Attracting birds to your backyard might be easier then you think. Birds love the simple things, food, water
Make a simple bird house from scraps of 1/2"
This is a nice gift for nature lovers, gardeners, or for someone special on Father's Day!
As you can from the picture at right, you can decorate the assembled bird house in many ways, from simple paint or stain to folk painting techniques finished with a non-toxic outdoor sealer.
Bird House Craft Supplies
- hammer
- waterproof glue
- s
- drill with 1-3/8" hole saw
- 1/2" plywood in sizes shown in Figure 1, for two bottom sides
- 1/4" plywood for two roof sections, each 7" x 5"
- 1/4" plywood for the front
- 5" length of dowel to finish the top,
- optional: paint or stain
 Instructions:
1. Before proceeding with each joint, start the nails, tapping into position, and then apply waterproof glue along the joint edge.
2. Butt
3. Next, glue
4. Glue
5. Using the 1 3/8 hole saw, drill a hole in the front section so that the top of the hole is 2" down from a corner; see finished photo for detail. Use a 1/4" bit to drill a hole for the dowel perch, 5'8" below the bottom of the larger entrance hole. S
6. Glue
7. Position roof sections so that they meet, but do not butt at the top. Glue
8. Glue the 5" dowel in the channel between the roof sections to complete this joint.
9. S
10. Lastly, glue the 3" dowel into position as a perch.
Your bird house is now ready to stain or paint as desired. BE CAREFUL what paints you choose, you do not want any toxins leaking into the wood
TIPS:
Ø Hang your birdhouse in a safe area, high on a pole or in a tree.
Ø If you hang your birdhouse close to the feeder,
Ø Try
© Copyright,
As seen in the June Issue of Main Street Magazine.
Printed in
To find out how to receive your free copy of